2/12/2010
Trail Food Inspiration for Valentines Day
I won't be spending valentines day in the Backcountry this year unfortunately, but for those of you that are or might be thinking about a last minute trip - here are a few food ideas to think about:
Wine
Wine in a glass bottle is heavy to pack in if you plan on being in the backcountry, and nobody wants broken glass or spilled wine in their pack or at camp. There are a few options here if you are a wino and want to bring a nice wine to drink on V-day Outdoors. First - Platypus (the company that makes hydration bladders) has a nice wine carrier that is a really nice way to bring your favorite wine to your destination. This carrier also preserves the wine so you can carry your favorite vintage for a few days without worrying that the taste/flavor will deteriorate. A cheaper solution is to go to the grocery and pick up a boxed wine to bring along. To pack it in your pack just remove the exterior cardboard box to expose a "wine bladder" inside. Boxed wines do however have alot more wine, so unless you and your special someone are big drinkers I would recommend drinking some of the wine prior to the trip, or pouring some of it out into a container to save at home. The other great part of this option is that you can repurpose the finished "wine bladder" into a nice pillow for sleeping by blowing it up slightly and wrapping a fleece jacket around it, or you can use it to transport water to or from your campsite. Finally - there are alternative packaged wines at the grocery store that I have seen more and more of these days. At some stores I have seen individual serving size "pouches", and I have seen large juice box type packages from several wine companies.
Cheese
For most parts of the country it is great time to be able to pack in cheese to your favorite spots because the cold temperatures will keep even the softest cheeses fresh like they were in the fridge. This could be a great snack on the trail or an appetizer for dinner. I like to bring in a baguette to enjoy with cheese. You also don't have to worry about the high fat since it is wintertime and you burn significantly more calories while hiking in the cold.
Chocolate
Chocolate actually provides great energy to hike with, and is easy to find around this time of year. If you want to be health conscious shoot for dark chocolates because they are healthier for you than milk chocolates. Check out this article from WebMd about the benefits of chocolate in our diets.
Full menu Idea
Backpacker Magazine- Trail Chef's Valentines Day Menu
Stay warm and have a good Valentines day everyone
2/06/2010
Backcountry Comfort Food - Macaroni and Cheese
 I really like the comfort food quality that macaroni and cheese can provide on a tough trip. There are a few ways you can make mac and chesse in the backcountry and some tips that I have found useful Here is my Compilation of Mac n' Cheese Options for your upcoming trips...
Freeze Dried - You can find freeze dried options from all of these companies
RichMoor
Mountain House
Backpackers Pantry
Alpine Aire
Boxed Store Bought
Classic Kraft - By just using water this box has a liquidy consistency, adding powdered milk helps out here alot, and if you have powdered butter too that's even better.
Kraft Deluxe - No Butter or milk needed, but the ready cheese pouch brings this in as the heavy weight for packing purposes
Kraft Deluxe Bistro - These are just like Kraft Deluxe with the ready cheese pouch, but have several cool flavors like sundried tomato parmesan, and creamy mushroom
Pasta Roni - Try shells and white cheddar - it is one of my favorite tasting boxes (needs powdered milk and oil/butter for best results)
DIY Options
Prepare a store bought pasta of your liking then add enough powdered cheese to make the pasta cheesy enough for your tastes
Make your own cheese sauce in this Great Recipe from Backpacker - Alpine Mac & Cheese
When I want to Spice up plain Mac n' Cheese here's what I like to do:
Ingredients
Your favorite type of Mac
Chicken Pouch
Teaspoon Dried Onion Flakes
Pinch Garlic Powder
Pinch Red Pepper Flakes
1/2 cup of some type of Dehydrated Veggie - Peas, Carrots, sundried tomatoes....
Method
Combine spices, Veggies and Pasta at home in a Ziplock bag. At Camp Prepare the mac n cheese with the spices and veggies. A few minutes before the mac is done add the chicken pouch to the pot.
Other Recipes to check out
One Pan Wonders - GoBlue Fredo (scroll down on page)
2/02/2010
Dehydrated Hummus
Ingredients
4 garlic cloves, minced and then mashed
2 15-oz cans of garbanzo beans (chickpeas), drained and rinsed
2/3 cup of tahini (roasted, not raw)
1/3 cup freshly squeezed lemon juice
1/4 cup olive oil
1/2 teaspoon of salt
Method
1. In a food processor or blender combine the mashed garlic, garbanzo beans, tahini, and lemon juice. Process until smooth. Add salt, starting at a half a teaspoon, to taste.
2. Remove after completely blended, and spread onto food dehydrator trays
3. Dry Overnight or until no moisture is visible in the hummus
4. Take dried hummus out from dehydrator and process to a powder in a blender or food processor. At this point you can divide into multiple servings in ziplock bags depending on the portions you want (I half this batch size to make lunch two days for two people)
5. In Camp - a few hours before you plan on eating the hummus start the rehydration: first add the olive oil- and remember if you divided your batch to adjust the measurement accordingly (i divide into two servings, so for each serving I add 1/8 cup of olive oil) then add enough water to the ziplock bag to thoroughly soak the powder, but not to much to where it becomes "liquidy".
6. When you are ready to eat the hummus check the consistency of the hummus - add more water if needed to get the consistency you want, and make sure it is all mixed up well by giving it a good stirring
*I like to bring Pitas to eat with hummus, but crackers, bread, and tortillas are all good too
*I typically carry olive oil with me on trips to cook with, if you usually don't, just find a container that seals well and can hold the amount of oil you need. The reason I add the olive oil after the mix has been dehydrated in this recipe is that fat content negatively affects dehydration time and results, and I think that the taste is better by adding the olive oil during the rehydration time.
My Trips
I wanted to make a list of all the places I've been backpacking at, so here is a start to my growing list, I have been to alot of these places more than once too.
Cohutta Wilderness - Cisco, Georgia
Blood Mountain - Blairsville, Georgia
Springer Mountain - Ellijay, Georgia
Raven Cliff - Helen, Georgia
Preaching Rock - Suches, Georgia
Rabun Bald - Dillard, Georgia
Shining Rock Wilderness - Brevard, North Carolina
Great Smoky Mountain National Park - Bryson City, North Carolina
Bartram Trail - Dillard, Georgia
White Mountains - New Hampshire
Joyce Kilmer/ Slickrock Wilderness
Black Mountains
St. Joseph's Wilderness Preserve - Cape San Blas, Florida
Cumberland Island - St. Mary's, Georgia
Toccoa River Trail - Cleveland, Georgia
1/30/2010
My Photos
I'm Going to be filling up this flickr Photstream with all of my past trips and photos from now on, check them out here.
Created with Admarket's flickrSLiDR.
Trail Food Dehydration Resources
I've only really gotten into dehydration recently but I am really amazed at the potential of it. For longer trips that require weight conscious ingredients, or if you want to save money - D.I.Y dehydration is an awesome hobby to pick up if you are serious about backpacking or your food for it.
There are alot of free resources out there on the web to sift through for doing your own Drying/Dehydration at home, but I found some that I really liked and thought were useful to people just wanting to start up in it:
Dehydrating Food - Backpacker Chef
Trail Cooking.com - Dehydration 101
Choosing the right Dehydrator
Alton Brown - D.I.Y Food Dryer
D.I.Y Solar Dehydrator
1/27/2010
Smoky Mountains Backpacking Trip
This was a really cold trip and it snowed pretty much the whole time we were out, but we all had a great time checking out the winter scenery. My menu turned out great, and gave me plenty of calories for the cold temperatures (see bottom), and filled me up nicely. Unfortunately we all neglected to bring a nice camera, but we found a disposable camera in Bryson City at a general store to bring along, I think the camera had been sitting in the store for a long time so that's why the photos have the "vintage" appearance...

My Friend Alex Daley Making his way through the snow

Taking a break on the last day out


Trucking through the snow- My Friend Matt Lottes is on the Right and that's me on the left

Mt. Collins Shelter where we stayed at Night One

My Menu On the Trip
Oatmeal w/ brown sugar, cinnamon, almonds, raisins, butter, and maple syrup
Bagels with Peanut Butter and Jelly, or cheese
Cheese Macaroni with Turkey
Parmesan Alfredo Linguine
Loaded Cheese Grits
Chocolate Pieces
My Special Blend Trail Mix
Hot Chocolate
Tea
Coffee
1/26/2010
Backpacking With Fresh Fruits and Vegetables
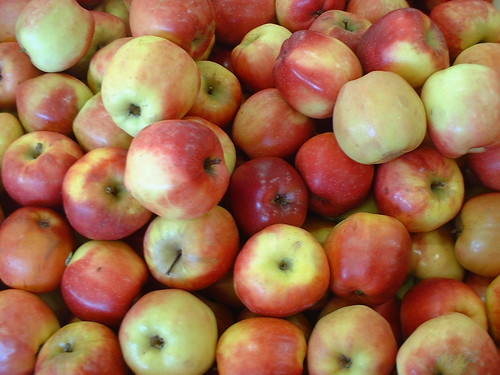
There still are things that just won't fare well in your pack no matter what, but I'm going to go through what I have been successful with below:
Apples - Apples are one of my favorite fruits to eat while taking a break on a summer hike, they really quench your thirst and the sugars give you a little energy boost to get started up again.
Oranges- Oranges have tough skin and pack nicely, have one for breakfast sometime and its like having a fresh squeezed glass of orange juice
Lemons- If you enjoy fishing on trips lemons can be a great ingredient to eat with fresh fish you might have landed. Lemons also are good added to water, or teas. Vitamin C in these is great for keeping your body healthy and vital as well.
Broccoli- Broccoli stays very well in a pack actually, and it is packed vitamins and minerals. Raw or cooked this can be a good thing to toss into a menu
Garlic- Garlic stays better than anything in a pack, it can bring awesome flavor into any meal, I really like bringing a few cloves on a trip
Onions- These also stay very well in a pack, onions can be really versatile too
Peppers- Fresh Hot or sweet peppers are a nice ingredient to have at hand and stay well
Tomatoes- Yes Tomatoes bruise easily, but if you wrap one in a paper towel and put it in a cup or bowl they can stay well protected
Mushrooms- These can stay good for a few days in a pack, I just leave them in the store styrofoam box, and poke a few tiny holes in the plastic wrap on the top
Spinach- If you want to bring a leafy green into the woods, I would go for spinach. At home just dry out the spinach really well and you will be surprised on how long it will last without refrigeration.
Other Tips:
Start out with the freshest produce you can get, don't use anything bruised or diseased looking.
In the Summer time keep these items out of direct sunlight, preferably in a cool shady spot if possible.
Never store fruits and vegetables in plastic bags. Trapped gases produced by the ripening produce will accelerate spoilage. Store produce in paper bags or something that can vent.
Pack Strategically- don't keep fruits or veggies in a spot where they will get slammed when you put your pack down or move things around in your pack
1/19/2010
Sandwich Steamer
I came across this article on Outdoorzy, and though it was a really cool idea. Even in non winter conditions I can see some cool sandwiches to be made on the trail this way..... check it out here
1/08/2010
Camping Pancakes
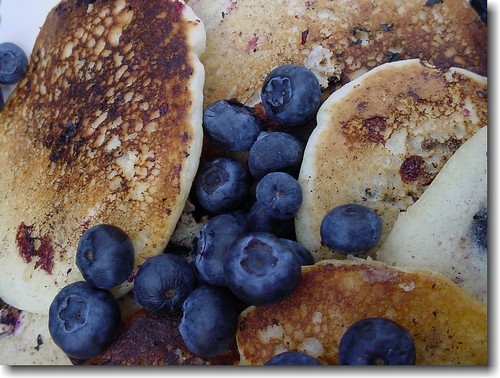
Pancakes are one of my favorite breakfasts, paired up with some maple syrup, sausage, and coffee they fill you up great and provide key energy for an active day. In my experience I have found that there are some tricks to making good pancakes in the woods or in the mountains.
Oil the pan - this is key even with non stick cookware, I like to have a little Nalgene squirt bottle filled with vegetable or olive oil as a staple in my cooking gear on all my trips.
Add ins - Wild Blueberries are great to find on the trail in late summer, but for the other parts of the year, or in case you don't luck out finding any wild blueberries, you can buy dried blueberries at the store and add those to your pancakes. There are also several other dried fruits you can experiment with; cranberries, raisins, pineapple are all tasty. Nuts add a good texture and crunch, as well as flavor and protein to pancakes - Try some walnuts, almonds, or cashews in a batch.
Batter mixing - I like two methods for this - First off, I really like Bisquick Shake and Pour containers, you just add water, shake it up, then pour into your greased pan. I think these are perfect for shorter trips, or trips where you can spare packing room, because the containers can be slightly bulky in a backpack and are heavier than a zip-lock of pancake mix. Which is the second method I like; using a gallon size zip-lock bag. At home just add the amount of mix you need plus any add ins you want. Then at camp add the required water for your batch directly to the bag, zip it up, then shake and squish till its thoroughly mixed. Finally to pour the mix, cut the corner of the ziplock so it becomes a "pastry bag", then you can squeeze your mix neatly into your pan. Tryout whole wheat mixes if you can find them at your grocery store, i have found that i really like buckwheat pancakes. Also opt for "just add water" mixes to keep things simpler.
Pan - Non stick is the best bet here by far, also try to go for a medium or larger sized pan to make flipping easier, and when you pour out your mix leave a decent gap between the pancake and the rim of the pan to be able to easily slip your spatula in.
Have a decent Spatula - Several companies now offer folding backpacking spatulas that will do a great job on your pancakes so i recommend investing if you don't already have one.
Syrup - I go for the little Nalgene squirt bottles here again, you can just fill one up with some syrup from your house before heading out. Another lighter option is Maple Syrup Granules which when combined with water make syrup. (leave a little hot water from coffee/tea making and you can have hot syrup!)
Photo courtesy of : http://www.flickr.com/photos/85934826@N00/ / CC BY-NC-ND 2.0
Spearfishing - The Oceans Backcountry Cooking
Spearfishing in Mexico (II) from Guyzo on Vimeo.
First of all I'd like to wish everyone that reads this blog a Happy New Year, and hope you all had a great holiday season. I have been so busy with the holidays, working, and family and friends, that I have neglected writing for a while. I also did my annual winter backpacking trip in Great Smoky Mountain National Park (Pictures and stories to come) during the final part of my break from school. It was probably one of the coldest trips I have ever been on, and I definitely saw quite a bit of snow. In my efforts to defrost today I have been browsing some "warm weather" videos online and came across some cool stuff that I thought I'd share.
Spearfishing has become a major interest of mine in the past year or so, its not exactly backcountry cooking but I feel that it has the same characteristics that I enjoy about backcountry cooking, so I thought it was worth the mention. With Spearfishing you get to be out there on the water, doing something that is really fun, and if your lucky, you get fresh fish to chow down on, in a boat or on beach somewhere picturesque, just like if you were somewhere cool in the woods or mountains cooking something good up. I think what it comes down to is that the root of this blog is not only just the recipes, but that enjoying nature, good food with friends and family, and just relaxing and getting away from the grind from time to time is what this blog is trying to share.
12/12/2009
Trail Rice

12/08/2009
Cooking Videos
Videos that I like about cooking outdoors (I will keep adding with time)
Spicy Pad Thai - This is a good recipe that I tried and liked very much from Backpacker Magazines Trail Chef.
Backcountry Tiramisu - Another good one from Backpackers Trail Chef, this is a really special treat for a trip.
Pizza - An Alternative to my version, this pizza is made in a pan, and the crust is made instead of bought.
Pizza Ramen - Ramen meets pizza in a freezer bag! Really cool recipe
Salmon Alfredo - Pasta, sundried tomatoes, and salmon in a creamy alfredo sauce.
12/07/2009
Campfire Pizza

For my Version i picked up already made personal sized pizza crusts, a marinara spice packet that uses tomato paste and water to make a sauce, and went with mozzerella, mushrooms, and spinach as my toppings. (Note that this recipe needs a campfire to cook it so plan accordingly, and don't disregard campfire bans please!)
Ingredients (for three pizzas)
 One package of Crusts (3)
1 packet of pasta sauce spices (I found near tomato sauces in jars at the store)
1 small can of Tomato Paste (spoon out into a quart ziplock bag at home)
1 cup of water
1 small can of mushrooms (drained and put in a small ziplock at home)
Two handfuls of spinach (placed in a ziplock)
Parmesan cheese (optional)
2 two foot rectangles of Aluminum Foil
To begin this I make a normal campfire at my site for the night and make sure its a decent size so I can get some hot coals going. After I do that I make the sauce; first open the quart ziplock that already contains the tomato paste, then add the spice packet. Now you will need to add the water (I went ahead and added less water then directions on the spice packet called for because i didn't want the sauce to be runny), so just add water slowly till you achieve the desired consistency, seal it, then shake and squish the bag up to mix everything really good.
Next Pull out your two Aluminum Foil Pieces, and put your Crusts on top (shiny side facing down). Top the pizza with the sauce, then cheese and toppings. Now wrap the aluminum up around the pizzas but don't press down on top of the foil, try to leave some gap between the top of the cheese and the foil.
Now spread out hot coals from your fire with a stick into a flat layer that can fit all of the pizzas. Place two sticks flat below each pizza so air can flow underneath and keep the coals alive and hot. Additionally I also try to circle the pizzas with logs or sticks that are still burning to achieve more heat. The Pizza is going to take about 5-10 minutes to cook this way, just keep peeking into the Aluminum foil until you see that the cheese is gooey, then remove carefully with some sticks, and dig in!
Backpacker Magazine's Trail Chef made pizza with her own dough and in a pan, this could be an alternative recipe if you can't have a fire. Check it out here.
11/28/2009
Master The Wrap
I think wraps are one of the best, most versatile foods for the backcountry - you can use a lot of different things to create awesome combinations. Tortillas last long and pack pretty well in your pack, just make sure they aren't somewhere where they can get torn up by your gear. Pitas also are a good alternative for wraps.

Pretty classic and straight forward. Try to use any little packets of jelly you might have, also honey is a good substitute. Peanut butter packets like this
Chicken
Grab some chicken in pouches in the tuna section at the grocery store, they don't require draining and are pretty convenient to use.
Tuna
Tuna pouches are your best bet because they save weight and are clean and easy to use. Also if you want to mix your tuna with stuff before you make your wrap you can mix in the pouch.
Meats
Hard Pepperoni and Salami last long and can be bought in various sizes that can suit your trip length. Already cooked bacon are good in wraps as well. Sausages are also a great choice for wraps as well.
Beans
Beans go good in wraps and have a lot of good protein, just get instant or already cooked beans. Also dehydrated beans make for faster cooking time. Hummus made from chickpeas is a tasty protein packed dip to serve on your tortillas or pitas as well.
Rice
Rice adds a filling touch to a lot of wraps, I especially like it for dinner because it's usually a meal where you really want to fill up substantially. Recently, I picked up the 90 second Uncle Ben's Rice pouches that were meant for the microwave, then added a little bit of water and steam it in a pot till it was ready in two or three minutes.
Toppings/ Condiments
Check out the condiment article for other condiment ideas for your wraps. Canned olives, pickles, peppers are also some good toppings for wraps. Open and drain them at home and put them in ziplocks before heading out. Cheeses go well in almost all wraps so try some different cheeses out, just be carefull with temperatures and cheeses, and know that soft cheeses will spoil a lot faster than hard cheeses. Salsas in little pouches are great for wraps too (Chick-fil-a has them for their breakfast burritos) and can usually be subbed in place of fresh tomatoes. Don't forget seasonings too, they can improve the flavor of any wrap.
Caesar Chicken Wrap (makes two)
1 Chicken pouch
1 packet of caesar dressing
2 mozzerella cheese sticks(shred them on top)
1/4 cup sweet red peppers (from a can, drained and stored in a ziplock prior to use)
Mix the chicken with the caesar then spread on tortilla or pita, top with peppers, and shredded cheese then wrap it up. (I usually will season this with some salt pepper and garlic powder)
Tuna Wrap (makes two)
1 Tuna Pouch
2 packets of mayonaise
2 packets of relish
1 packet lemon juice
2 Cheedar Cheese sticks shredded on top (Optional)
Mix everything except cheese together (I usually will season this with some salt pepper and garlic powder), spread on tortilla or pita, then top with the shredded cheese and wrap it up
Photo Courtesy of http://www.flickr.com/photos/acoustic_punk_sound/ / CC BY-NC-ND 2.0
TJ2XJJCKFPU8
Condiments

Condiments can make any dish taste better instantly and the great part is that you can get small packets for free or el cheapo from restaurants, deli's, fast food places, or takeout. Go ahead and dedicate a box or bag to hoard all of the little packets of useful stuff somewhere where you can access them when you are packing your food for trips. Here are some things that are good to hold on to and are pretty common to find:
- Ketchup
- Mustard
- Mayo
- Relish
- Barbeque Sauce
- Hot Sauce
- Soy Sauce
- Salad Dressing Packets
- Special Sauces
- Jelly/Jam
- Honey
- Lemon Juice
- Coffee Creamer
- Sugar/artificial sweetener
- Salt/Pepper packets
If you want to avoid the lag time in collecting these packets or can't find some of them that you want or need I have found that this site is great and has all of those mentioned and then some. I especially like their peanut butter packets!
11/20/2009
Sites that Backcountry Cooking Digs
Here's a list of cool sites that pertain or relate to backcountry cooking, more will come with time!
Blogs and Reference Materials
Products
Other
Quinoa

Quinoa is typically cooked like rice with a 2 to 1 water to grain ratio and simmered quite a while till soft. When we are in the backcountry simmering can use up valuable fuel and time. To adapt to this, we need to soak the quinoa to reduce the cooking time. If you are going to be eating your quinoa for breakfast and you're already at camp, put your 2 to 1 mixture of water and quinoa in a pot and cover and soak all night while you are sleeping. However, if you are not at camp yet or want to have quinoa for dinner, I recommend using a water bottle with the mixture so it can be soaked in advance and transported with you neatly. This technique also will work if you are in freezing conditions because you can keep your quinoa water bottle soaker in your bag to thwart freezing.
Quinoa Recipe
One cup dried quinoa Makes 2 1/2 to 3 cups cooked quinoa
1.While your at home rinse your quinoa off before you pack it into a ziplock or your water bottle soaker.
2. After soaking overnight or all day, strain out the soaking water at camp. Place the drained quinoa in a saucepan, add 1 cup fresh water, a pinch of salt and a tablespoon of oil, bring to a boil, cover and reduce the heat and simmer until the liquid is absorbed. Allow to steam, covered, for about 5 minutes or until it can be fluffed with a fork. Then serve.
Breakfast Variation
Add 1/4 cup of dried or fresh fruit of your choice while cooking
Use a small amount of maple syrup, brown sugar, or honey to sweeten (your call)
Dash of cinnamon
Couple tablespoons of nuts
Blackberries, pecans and honey is a great combo!
Dinner Variation- Curry Chicken Quinoa
Add one package of Chicken in a pouch (found near tuna in the grocery store)
teaspoon of curry powder
pinch of garlic powder
chopped onion and pepper are great if possible to pack in and use, if not try adding some dried chopped onions and some dried pepper flakes
any veggie you can find dried would work well in this too just add in the beginning so it reconstitutes
dried cranberries can be good in this as well!
11/18/2009
Coffee In The Woods

Who doesn’t love a hot cup of coffee in the morning? And coffee on cold/rainy mornings while camping is the absolute best. There are plenty of options out there for the backcountry now, to compare them it’s important to consider weight, ease of use, and quality of the coffee. If you go out and search coffee on camping and backpacking retailers, you will see there is quite a plethora of gizmos and gadgets that can be used to make your morning Joe. Each comes with their advantages and disadvantages, and they will all suit different people and different situations better, But here's what I've found.
Instant is pretty straightforward.... you add a mix to some hot water and your coffee is ready. Advantages are weight savings and the easy cleaning of your coffee cup because there are no messy grounds that you have to deal with. At my local grocery store I found instant mixes such as Folgers, and Nestle. These offer a warm cup of coffee but are not quite there flavor wise, if you are a coffee connoisseur. Recently, Starbucks released its VIA™ which I had the chance to taste a couple days ago. It tasted a lot better than the other instants but is pretty pricey (around $10 for 10 packets). There is one other type of instant I have tried, it's called Java Juice ®
Cowboy Coffee
You have to be a little hardcore to enjoy this one, I decided to mention it because I have tried it on several trips and have enjoyed it. Basically, this process just adds coarse coffee grounds to hot water, the mixture is stirred then allowed to rest, where the grounds hopefully settle to the bottom of your cup. Some people believe that adding a tiny bit of cold water during the settling process helps the grounds settle but it is debated by cowboy coffee makers. Check out this video on youtube to get the idea down.
Presses
There are several French presses aimed towards campers and backpackers. There are ones that are uni-taskers for coffee or there are designs that fit nalgene bottles, or jetboil stoves. I think that I like the Jetboil Coffee Press
Filters
At the grocery store you can find "tea bag" individual coffees in the coffee section and these can be pretty nice because they use grounds but keep cleanup simple because the grounds are contained in the "tea bag". Another option filter oriented is to just buy some cone shaped coffee filters and a filter holder or just fold over the edges of the filter around a cup and slowly pour your hot water into the cup. There are also filters that fit on the top of mugs that are reusable. Finally there are tea balls that can be used; there is one designed like a spoon that you stir in coffee or tea into your mug, or another that is just a small cylinder canister to add grounds to and place inside of a cup. This method can be simple and still give you good flavor because you can use the coffee of your liking inside of your selected filter.
So what it boils down to is your personal preference and the type of trip you are planning for. Each method suits different types of trips, it just depends on what you like, and find works best for your system.
10/08/2009
About

My name is Nicholas Orlosky and I am the founder and author for this blog. I currently live in Athens, Georgia where I am a fourth year college student pursuing a degree in Parks and Recreation Management. My passion for the outdoors includes hiking, backpacking, canoeing or kayaking, and climbing, or whatever else I can do to enjoy nature and its grandness. If I’m not lucky enough to be outdoors on one my trips, my second love is cooking great food at home. I have been experimenting with cooking for about six years now, and really enjoy it. You might say, I love food and everything about it; the cultures behind it, the ingredients, and even the preparation. It occurred to me one day, wouldn’t it be an awesome idea to really sit down and bring these two things together and share it with the people that would also be interested, thus Backcountry Cooking was born!
Look for new articles that will pop up as quick as I can sit down and write, I have a lot of ideas to share with you all, and I'm sure more will develop as I head out on my trips and come back to share my Backcountry Cooking experiences with you. Hope you enjoy it and don’t forget to tell your friends and family that might be interested!
Contact:
Subscribe to:
Posts (Atom)